
How To Setting Up A Cash Drawer
 If you’re planning to open your cash drawer manually, simply place it on your checkout counter and keep its key in a secure place nearby.If you want your cash drawer to open automatically when you complete a sale, make register adjustments (e.g. opening or closing counts) or select Open Drawer in Retail POS, you need to connect your cash drawer to your receipt printer with a cable. This way, the receipt printer can let the cash drawer know when it’s printing a receipt. This triggers your cash drawer to open as its mechanism is printer-driven. To set up your cash drawer to open automatically, select the tab that matches your Lightspeed Retail POS setup (desktop or iPad). From there, follow the setup instructions. They’re applicable to all our supported cash drawers as their setups are all essentially the same. What you needTo set up your cash drawer, you need the take out the following from your hardware shipment:
Cash drawer
Money tray insert (usually inserted in cash drawer already)
Cash drawer cable
Keys
Note: We send you an email as soon as we ship your hardware. If you have further questions regarding your shipment, please contact the shipping carrier or contact Billing. Before you beginBefore you set up your cash drawer, we do recommend setting up your receipt printer. This way, you’ll be able to test your cash drawer after connecting it to your receipt printer.
Desktop
iPad
Setting up a cash drawer on your computer To set up your cash drawer on your computer, you need to:
Connect your cash drawer to your receipt printerConfigure your cash drawer to open automaticallyTest your cash drawer
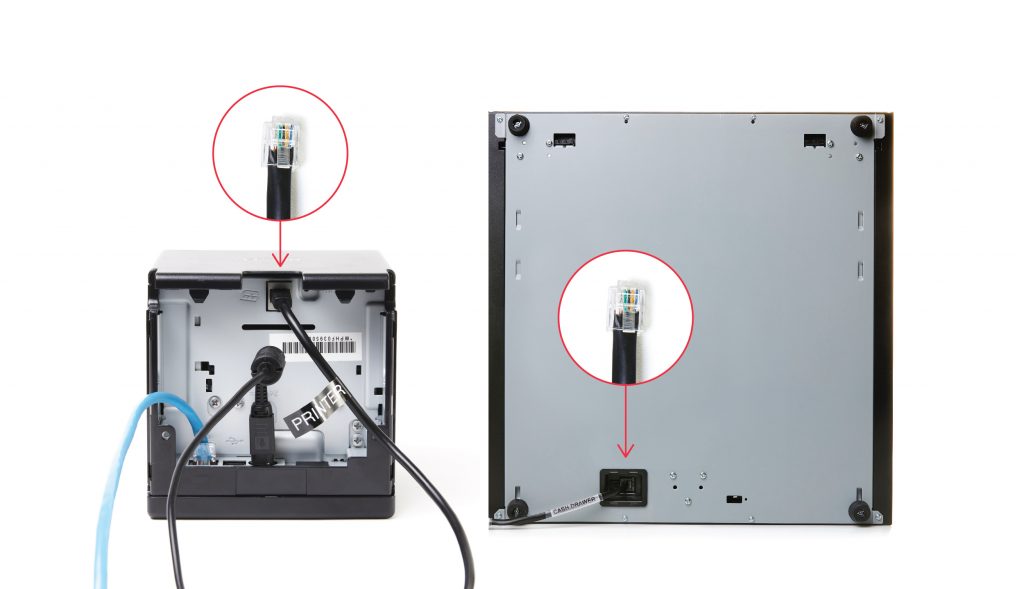
1. Connect your cash drawer to your printerThe cash drawer cable that comes in your hardware shipment is sometimes labeled CASH DRAWER on one end and PRINTER on the other. This is to help you connect your cash drawer to your receipt printer correctly. If not, the larger end of the cash drawer cable connects to your cash drawer and the smaller end connects to your receipt printer.
Connect the cash drawer cable to your receipt printer and cash drawer.

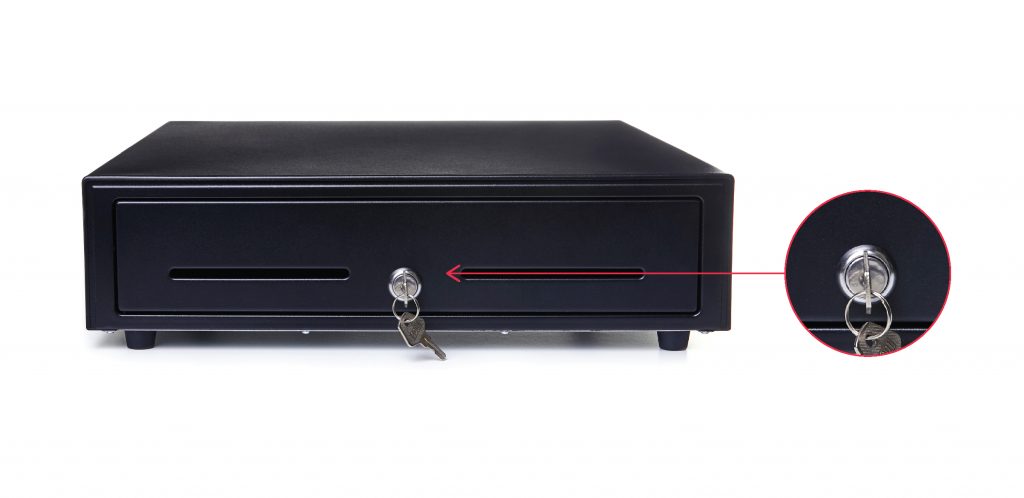
Turn the key to the unlock position.
While the cash drawer is unlocked, it will pop open automatically whenever you print a receipt. 2. Configure your cash drawer to open automatically
In Retail POS, go to Settings > General Options.
From the Cash Drawer (iPad and Lightspeed Hub only) drop-down, select one of the following options:
All Payment Types (default)
Cash Only
Never
Tap Save Changes.
3. Test your cash drawerThe fastest and simplest way to test your cash drawer is to go to Sales > Open Register or Sales > Add Amount and select Open Drawer. Alternatively, if you don’t have permission to make register adjustments (opening counts, closing counts, deposits and withdrawals) and, as a result, can’t access the Open Drawer button, you can also make a sale and ask your manager to void it afterwards. If you’ve also set your Cash Drawer setting under General Options to Cash Only, you need to print a sales receipt to test the setting. To do so:
Go to Reports > Received.
From the payment types drop-down, select Cash.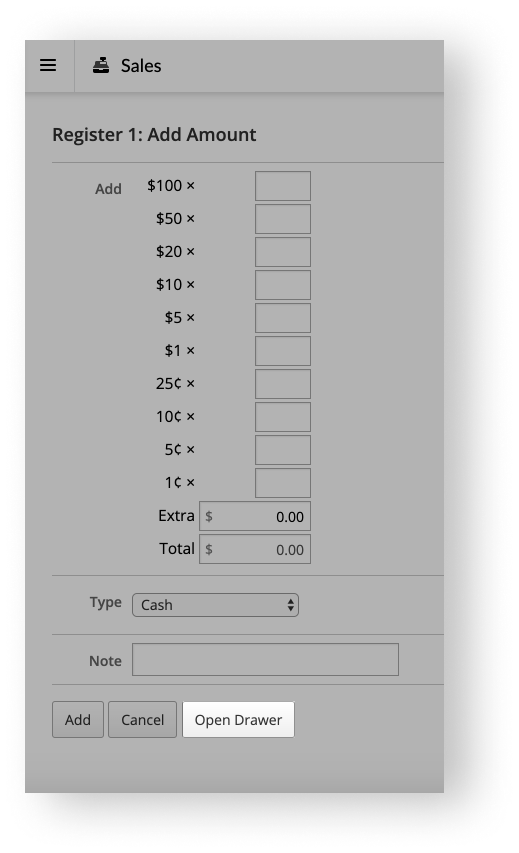
Select Search.
Under the SALE column, select a Sale ID.
Select Print Receipt. A receipt should print and your cash drawer should open.
Repeat steps 2-5 for any payment type other than cash. A receipt should print but your cash drawer should remain closed.
Go to Reports > Received.From the payment types drop-down, select a payment type.Select Search.
Under the SALE column, select an ID.
Select Print Receipt. A receipt should print but your cash drawer should remain closed.
Repeat steps 2-5 for all your other payment types.
Alternatively, if you don’t have access to reports, you can make sales and ask your manager to void them afterwards.